WorkWithPlus 12.16

Release date: Wednesday 17th April 2019

Create Instance from variables defined on the Web Form

The possibility to create an instance and add automatically the variables/attributes that are already included in the WebForm of the Web Panel was added. 

In order to use this feature, you have to open the Web Panel, go to the Pattern and select the template that you want to base your Web Form on (as usual). Then, select the option: 'Current Web Form variables' and the instance will add the variables from the Web Form and define it like they are defined in the object. This feature is useful for migrating a KB that was created without WorkWithPlus, so that you have a fast way of creating the Web Form instance.

Sample 1 - Selection with SDT Web Form

  1. The Web Form was created without any pattern:
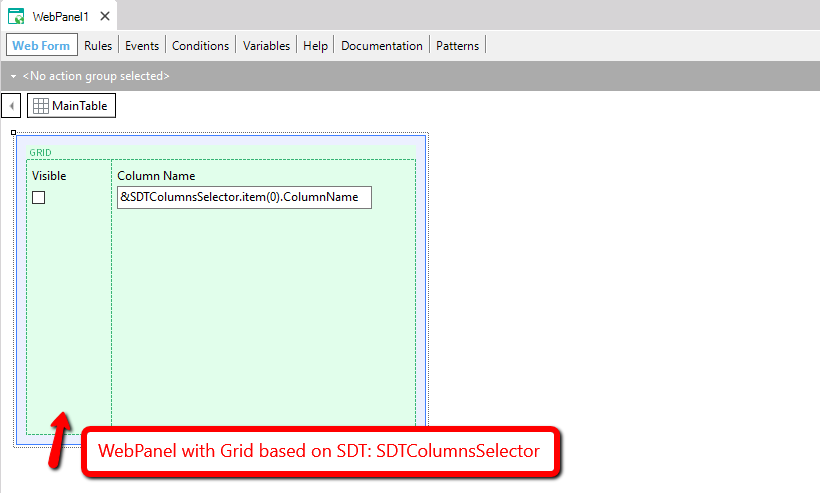
    GeneXus Web Form editor shows a WebPanel1 with a Grid control named GRID containing a Visible checkbox column and a Column Name text box bound to &SDTColumnsSelector.item(0).ColumnName, with a red annotation reading "WebPanel with Grid based on SDT: SDTColumnsSelector".
     
  2. Select a Template, in this example Selection:
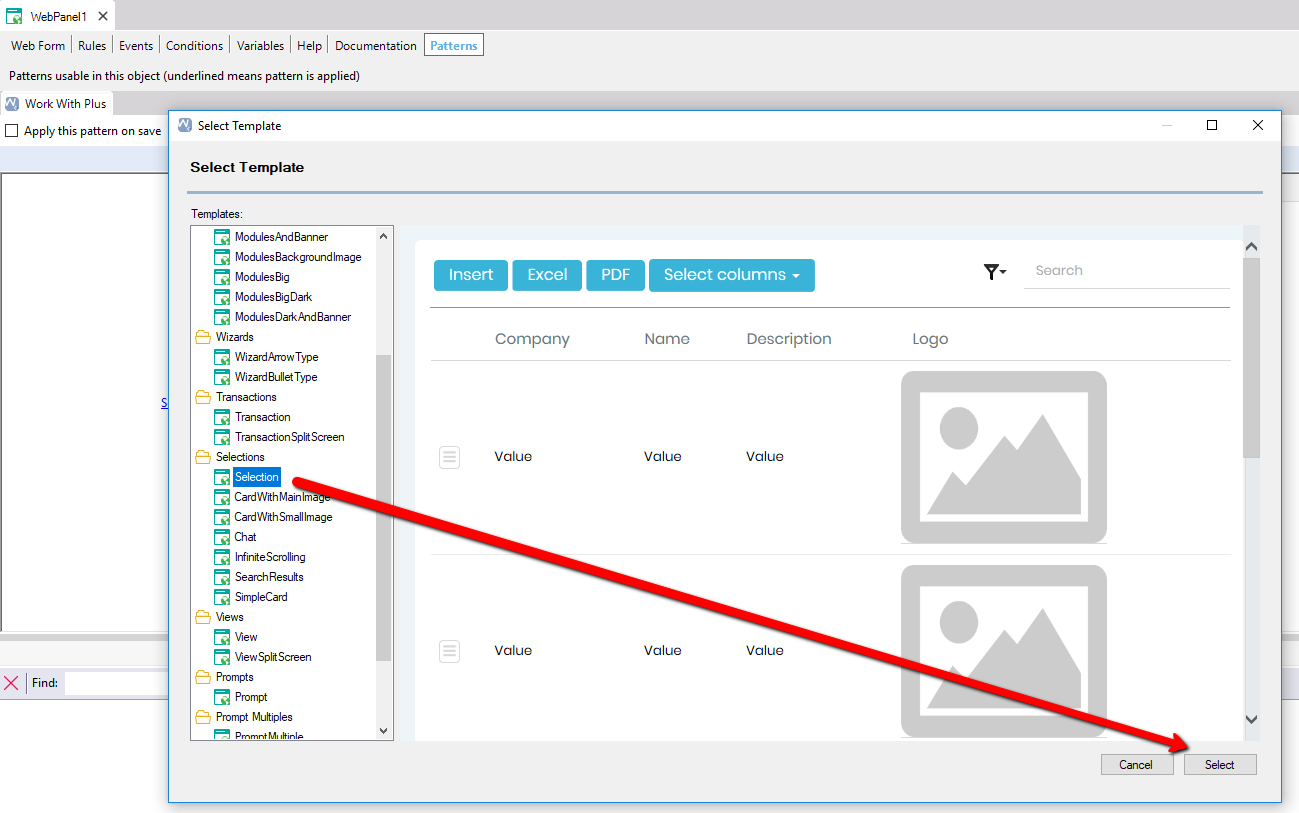
    WorkWithPlus Patterns tab of a Web Panel shows the Select Template dialog open, with a Templates tree (ModulesAndBanner, Wizards, Transactions, Selections, Views, Prompts) and the Selection template highlighted; a red arrow points from the Selection preview grid (with Insert, Excel, PDF, Select columns buttons and Company/Name/Description/Logo columns) toward the Select button.
     
  3. Then select the option 'Current Web Form variables'
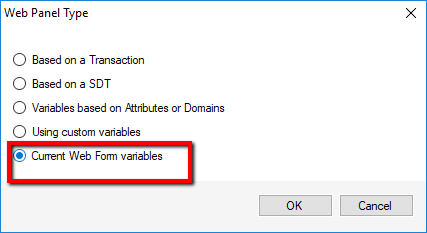
    Web Panel Type dialog lists five options for the panel's data source: Based on a Transaction, Based on a SDT, Variables based on Attributes or Domains, Using custom variables, and Current Web Form variables, with "Current Web Form variables" selected; OK and Cancel buttons at the bottom.
     
  4. The instance was created, and the grid contains the same elements that were defined in the Web Form
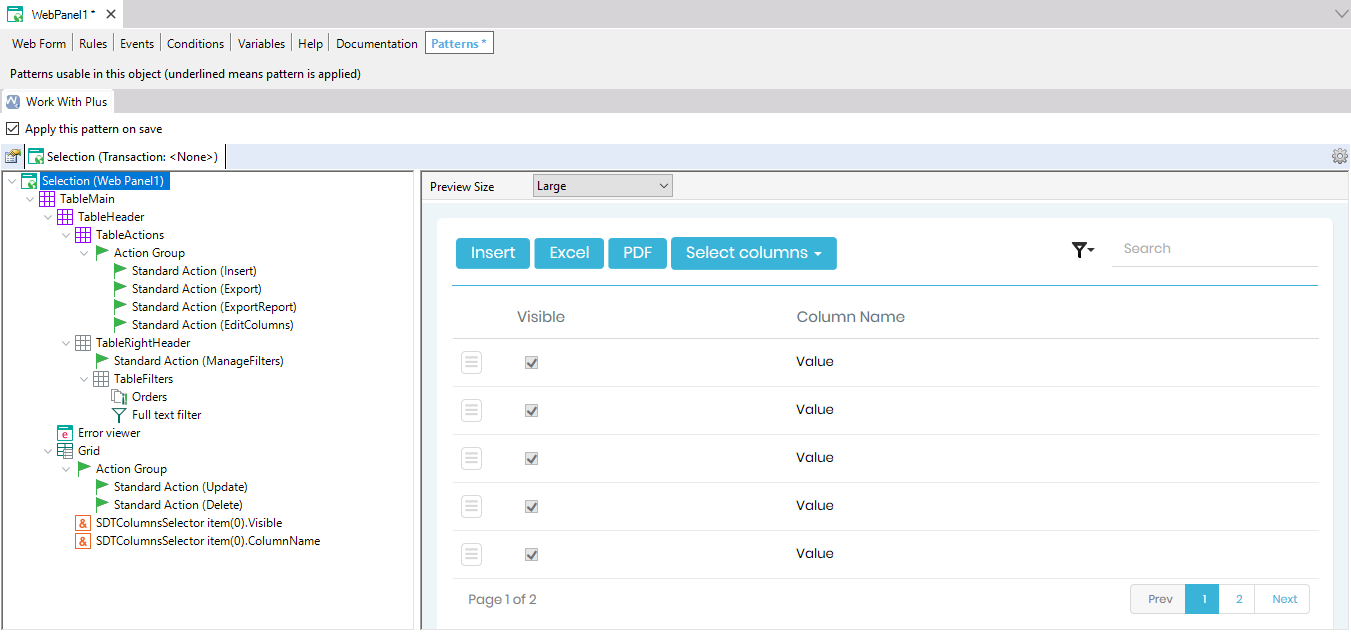
     WorkWithPlus Patterns tab shows the Selection pattern applied to WebPanel1, with the node tree (TableMain, TableActions, Action Group with Standard Actions Insert/Export/ExportReport/EditColumns, TableRightHeader, TableFilters, Grid) on the left and a live preview on the right showing Insert, Excel, PDF, Select columns buttons plus a Visible/Column Name grid with rows and pagination (Page 1 of 2, Prev/1/2/Next).

Sample 2 - Transaction with variables

  1. The Web Form was created without any pattern, and it contains plain variables and a grid with other variables:
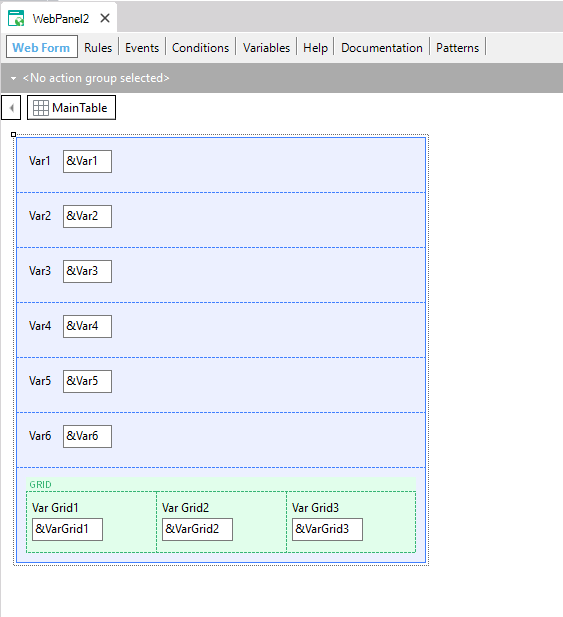
    GeneXus Web Form editor for WebPanel2 shows a MainTable layout with six variable input fields (Var1 through Var6, bound to &Var1-&Var6) followed by a green GRID section containing three columns Var Grid1, Var Grid2, Var Grid3 bound to &VarGrid1, &VarGrid2, &VarGrid3.
     
  2. Select a Template, in this example Transaction:
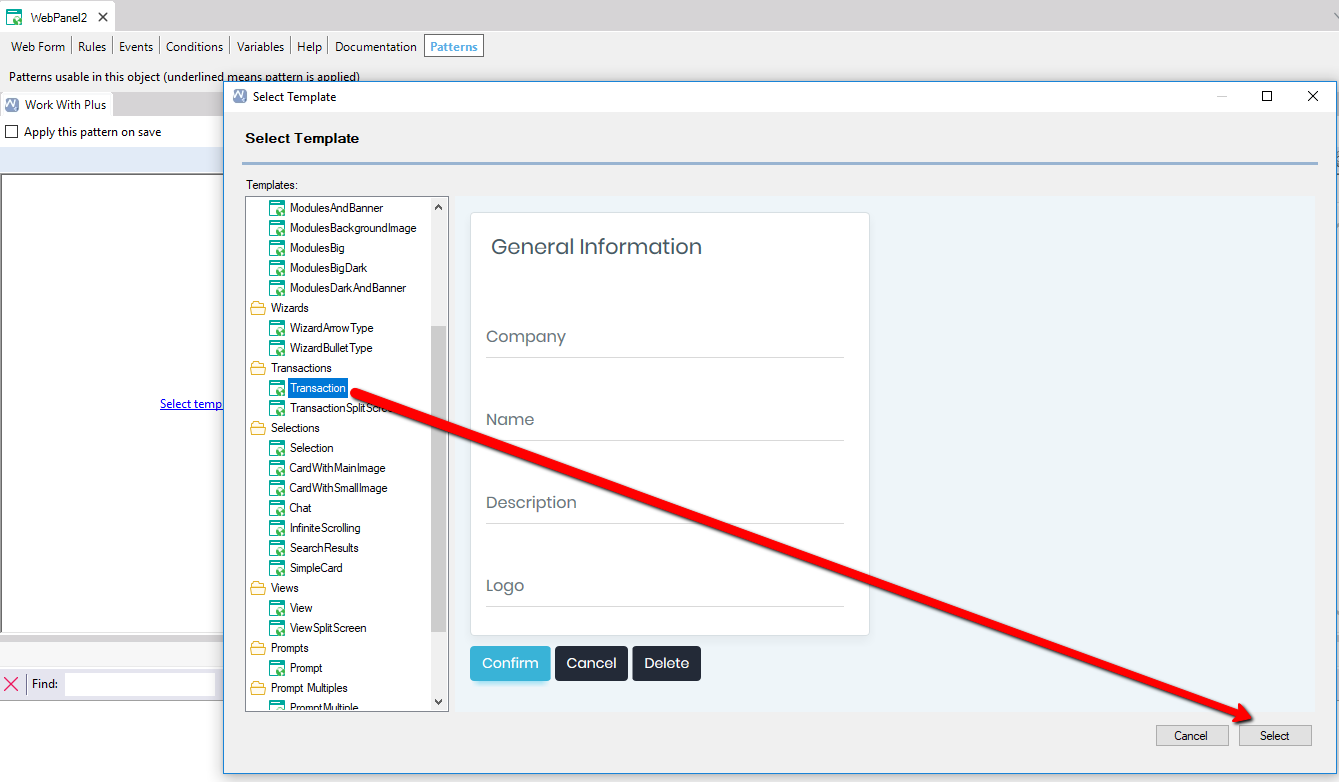
    WorkWithPlus Patterns tab shows the Select Template dialog for WebPanel2, with the Templates tree expanded to Transactions and the Transaction template highlighted; a red arrow points from a "General Information" preview form (Company, Name, Description, Logo fields with Confirm/Cancel/Delete buttons) toward the Select button.
     
  3. Then select the option 'Current Web Form variables'
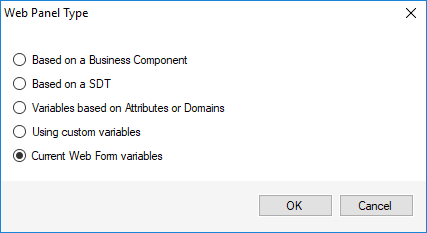
    Web Panel Type dialog lists five data-source options: Based on a Business Component, Based on a SDT, Variables based on Attributes or Domains, Using custom variables, and Current Web Form variables, with "Current Web Form variables" selected; OK and Cancel buttons below.
     
  4. The instance was created, and there are variables in a Table and a grid which contains the same variables that were included in the Web Form, with the same definition
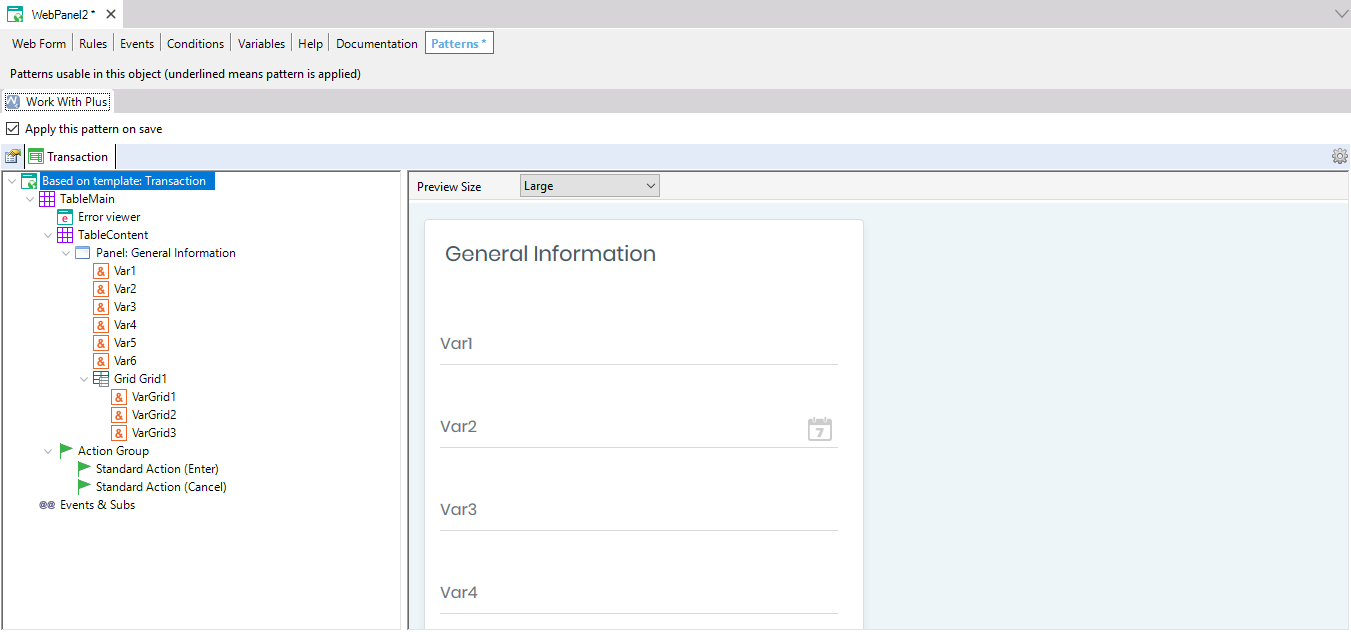
     WorkWithPlus Patterns tab shows the Transaction template applied to WebPanel2, with a node tree (TableMain, Error viewer, TableContent, Panel General Information with Var1-Var6 and Grid1 with VarGrid1-3, Action Group with Standard Actions Enter/Cancel, Events & Subs) and a live preview titled "General Information" showing Var1 and Var2 fields, the latter with a calendar icon.

Improvement for MsBuild generation

From this version, it won't be necessary to follow the steps explained in Running WorkWithPlus with MSBuild in order to generate the application by MsBuild.

Issue with ECommerce Design + Advanced Security + Runtime Load Menu  Issue 1280

When running the Design System Wizard selecting the ECommerce Design with Advanced Security and the menu loaded with options at runtime an error was thrown at the moment of importing the needed objects (when clicking in finish of the Design System Wizard).

Issue with Visible Condition in GroupBox inside Transaction  Issue 1281

When having a Group Box with something set in the  'Visible Condition' property, and in the 'Theme Class' blank (so that it takes the value from the WorkWithPlus Settings -> Theme node), the rule added for setting the group as visible is incorrect, as it assigns an empty class.

Issue with Actions inside FreeStyleGrid with type Image and Font Icon  Issue 1274

When having an action of type Image and Font Icon inside a FreeStyleGrid it throws an error while applying the pattern.

Arrows Up & Down in Quantity Field of ECommerce Design not displaying  Issue 1279

The arrows were not being displayed in the quantity field, because of some css property value missing.

StandardActions Export, ExportReport and ExportCSV display the property 'Confirm'  Issue 1270

The property 'Confirm' should not be visible in the Standard Actions 'Export', 'ExportCSV' and 'ExportReport' because it doesn´t make sense. This property won´t appear anymore for this actions.

The image of ECommerce Login, style 'Left image' is not being displayed in the Design System Wizard Issue 1278

When running the Design System Wizard, and selecting the ECommerce Design and then the Login style 'Left image', the image was not being displayed.