
Template node has the following properties:
Specifies the "Design System Wizard" configuration xml file.
Specifies the default value for the property 'Include in Data Selector' on the 'Automatic Conditions' nodes. The property 'Include in Data Selector' specifies whether to include that Automatic Conditions in the DataSelectors generated with the conditions of the filters or not. These applies only for the GridObjects which its property ' Generate Data Selector For Conditions ' is True. In the link provided there is an example of both properties.
Specifies the way that the validation messages will be displayed when a Web Panel contains required variables (variables with the property 'Is required' true). The options are:
- One at a time: it will display only one error message at a time, in the error viewer (or error messages User Control if you have it on the Master Page).
- One at a time (on the field): it will display only one error message at a time, next to the field.
- All at once: it will display all the error messages thrown, in the error viewer (or error messages User Control if you have it on the Master Page).
- All at once (on the field): it will display all the error messages thrown, but each one in the field that is related to.
Specifies which controls will WorkWithPlus add in the WebForms when that instance contains one of the following nodes: Panel, Tabs, Action Group of type DVelop Bootstrap, etc. The possible values are Responsive and Previous versions compatibility. The Responsive ones are the same controls with the difference that they don't import the bootstrap.js and bootstrap.css as GeneXus does it when generating a Web Responsive application.
Responsive (Based on containter type) it uses a new type of control that it doesn't needs to generate HTML tables. This only works in GeneXus 16 or higher
Specifies the version of the icon fonts of Fontawesome that you will be able to add in your application. The options are 'Fontawesome 4' and 'Fontawesome 5'.
Specifies which code optimizations will be made by WorkWithPlus. In each superior number, all the optimizations from the previous numbers will also be made.
The optimization numbers are:
- 0: No optimizations will be made (this is the value for all the KBs which started to use WorKWithPlus prior to version 10.1)
- 1: Sets the name of the tables of the FreeStyleGrids with Header as <GridName>_HeaderTable and <GridName>_DescriptionsTable instead of UnnamedTableFSWithHeaderHeader and UnnamedTableFreeStyleGridDescriptions
- 2: Improvement in Dynamic Filters: when the first item of the dynamic filters has operators it adds the options related to the first item directly in the web form (for the variable).
- 3: Improvement was included in the user control used for Columns Filters. This improvement lets GeneXus reference the necessary procedures (exposed as REST web services) and properly deploy them when you build the application.
Optimization in the code generated when you have dynamic filters with a search action.
- 4: Improvement in the definition of the Select All variable of the Multi Row selection.
- 5: The following improvements are included:
- For property 'Description Width' of an attribute or variable, it will set the property 'Label Width' with the selected value, instead of creating a Table with 2 columns, a Textblock at the left and the attribute with 'Label Position' none at the right (this is what is done in previous versions of WorkWithPlus (or with 'Optimization Number' 4 or less).
- For property 'Description Position' of an attribute or variable with value 'Top', it will set the property 'Label Width" with value 100% for all sizes. In previous versions of WorkWithPlus (or with 'Optimization Number' 4 or less), it creates a Table with 2 rows, a TextBlock for the label and the attribute with 'Label Position' none.
- 6: Improvement in the "PrepareTransaction" sub for Tabular Tab in Views to use variables that are never assigned.
- 7: The following improvements are included:
- Allows to use the 'Contextual actions visibility'. More information about this in the following link: 'Contextual actions visibility'
- When the environment/Web Panel is 'Smooth', the hidden variables are no longer included on screen. This makes the Web Forms much lighter, and this impacts in the generation time, compilation time and runtime performance.
- Improvement in the DropDownOptions User Control, creating lite User Controls with less properties in order to have lighter Web Forms.
- 8: The following optimizations are included:
Before setting 'Optimization Number' as 8, you need to import the XML named 'Optimization8File.xml' located in <GeneXus_Installation>\Packages\Patterns\WorkWithPlus\Resource.
- 9: The following optimizations are included:
- The Dynamic Filters are displayed as responsive
- The possibility to reorder, resize and fix columns of a grid is included (enabling it with the correspondent properties)
- 10: The following optimization is included:
- 11: The optimization is related to including the Transaction Level in the 'For each' commands added automatically by WorkWithPlus for Web associated with a grid object with base table.
For Each Person
...
EndFor
- 12: Optimization Number 12 is related to improvements made in Title Filter associated with numeric inputs:
- Support inserting numbers with decimals in the Title Filters which its column supports decimal values.
- Avoid the error when inserting more digits than the maximum amount of digits supported by the attribute/variable of the Title Filter.
Optimization Number 12 is available as of WorkWithPlus for Web 14 Upgrade #3.
- 13: Optimization Number 13 the following improvements are added:
- In a FreeStyleGrid that does not have infinite scrolling, the classic pagination actions (PageFirst, PageNext, PagePreviousm PageLast buttons) are only added when you have the DescriptionsAsHeader option set to true.
- In a form with 'Web User Experience' as 'Smooth' and that includes the pagination bar, a refresh command is not added after navigating to the first page and/or performing 'Clear Filters'.
- 14: Optimization Number 14 adds the Optimization in code generated in List to save the filters in the session.
- 15: Optimization Number 15 has the following improvements:
- Title Filter of a date field with range search and four digits in its year will display four digits in the range.
- Improvement of the visible rule that is added when a Table in a transaction has items with visible conditions, and some items share the same condition. In this optimization, the rule will be defined once per different condition.
Specifies whether to insert additional tabs in the View object for parallel transactions or not.
Specifies whether to generate View object when creating the instance by default or not. If you set this property on No but you have already created some View objects to some instances, the pattern will not delete those objects when executing Update Instances. Also, if you want to generate the View object for some specific transaction, you can make 'Add View' and the View will be generated based on the correspondant template.
Specifies whether to generate Selection object when creating the instance by default or not. If you set this property on No but you have already created some Selection objects to some instances, the pattern will not delete those objects when executing Update Instances. Also, if you want to generate the Selection object for some specific transaction, you can make 'Add Selection' and the Selection will be generated based on the correspondant template.
Specifies whether to take into account the property 'Show in default form' of attributes.
Specifies the maximum amount of attributes that will be added by default in the grids asociated to a transaction instance. For example, if this property has the value 25 and you have a transaction with 100 attributes and you go to apply Pattern for the first time, the grid of Selection and Prompt objects will have the first 25 attributes in the grid. The value 0 means that will include all the attributes with no limitations on the amount of them.
Specifies the maximum amount of filters to be added by default in grid objects. It´s analogous to the previous property but with filters. By default, WorkWithPlus will add one filter for the description attribute and one filter for each foreign key attribute (when the property 'Add related tables filters' that is in node Filters within the Transaction Templates has the value True). So, if this property has the value 10, and you have a transaction with 20 FK attributes, WorkWithPlus will add up to 10 filters by default.
Specifies the maximum amount of Tabs within the View object that WorkWithPlus will add by default when applying WorkWithPlus to a transaction. WorkWithPlus by default adds one Tabular tab for the transaction plain information, one GridTab for each level and one GridTab for each related transaction. So, if this property has the value 10, and the sum of the tabs of the transaction (plain information, parallel transactions, levels and 1-N relations) are more than 10, it will add the first 10 tabs.
If you want for some transaction to add the tabs, or to add one tab which is not included in those by default, you can follow these steps:
- Change this property to 0 and save the settings
- Depending on your case make one of these actions:
2.1 When you did not applied the pattern yet -> Go to apply pattern to the transaction the first time
2.2 When you have customized other objects within the instance and do not want to overwrite those changes -> Delete View object and make Add -> View
2.3 When you have customized the View object or some tabs within the instance and want to add some other Tabs by default -> Make right clic over the Tabs node of the View Tab of the instance -> Add from default -> Grid/Tabular Tab
and select the ones that you want.
- After saving the changes, open the WorkWithPlus Settings and set the property with the same value as prior to the 0.
Specifies whether the context will be used for inserting parameters in the insertion of records to transactions or not.
If this property is True, and we are visualizing one Person's Project, the following behaviour will occur:


On the other hand, if we set the property as False and we are visualizing one Person's Credit Cards, the following behaviour will occur when we go to add a new Credit Card to that person:

Specifies the default value for this property on instance's main node. This property specifies the program that will be invoked after Insert action is executed. The options are 'Return to caller', 'Go to View', 'Go to Selection', 'Stay in Transaction' and 'Nothing'.
Specifies the default value for this property on instance's main node. This property specifies the program that will be invoked after Update action is executed. The options are 'Return to caller', 'Go to View', 'Go to Selection', 'Stay in Transaction' and 'Nothing'.
Specifies the default value for this property on instance's main node. This property specifies the program that will be invoked after Delete action is executed. The options are 'Return to caller', 'Go to Selection' and 'Nothing'.
Navigation options:
- Return to Caller : returns to the object that invoked the transaction (by inserting a 'Return' in the AfterTrn event). If the property 'Return Procedure' has some value, it will invoke the procedure specified in that property.
- Go to Selection: calls the Selection object associated to the transaction.
- Go to View: calls the View object associated to the transaction and the record that was being inserted or updated.
- Stay in transaction: stays in the correspondent transaction, in update mode with the record that was being inserted or updated.
- Nothing: does not enter any code for navigation, and gives developer the flexibility to do whatever he wants by adding user code in AfterTrn event.
Specifies a procedure that will be invoked instead of making a 'Return' call. This allows user to handle by itself the call stack.
Specifies the default value for this property on instance's main node. This property enables auditing to the transaction. In consequence, the procedure LoadAudit<transaction> will be created, which will be invoked each time an action of this transaction is executed (at runtime). This procedure loads an SDT (AuditingObject) with the transaction name, the action executed and the old and the new values of each attribute (in case it is an upate). Then, the After Trn Event invokes AuditTransaction procedure which executes some operation defined by GeneXus developer.
Specifies the default value for this property on instance's main node. This property specifies a condition that will have to be accomplished in order to audit the action (INS, UPD, DLT) of the correspondent transaction. This could be an udp to a procedure, the value of some attribute or variable, etc. For example &Context.RoleId <> 'Administrator'.
Specifies the levels of the audited transactions that will be considered in the auditing. This can be just the firs level of them 'Only First Level' or first and second levels 'First and Second Levels'.
If you want to read more information about Auditing, follow this link: Auditing
Specifies the default value for this property on instance's main node. This property specifies whether the UpdateInstances functionality will update all nodes with its properties, will only merge node's properties all will not update any node neither its properties.
Theme to be assigned to the tables created when some node is merged to another node (its property mergeWithPreviousCell is true).
Cell spacing to be assigned to the tables created when some node is merged to another node (its property mergeWithPreviousCell is true).
Cell padding to be assigned to the tables created when some node is merged to another node (its property mergeWithPreviousCell is true).


Deprecated, these properties are hidden from version 15 Upgrade #4.2.
Specifies the domain that represents an address, and when user creates attributes based on this domain, will show in google maps the location of it when the attribute is in display mode (read only).
Specifies the domain that represents a geolocation. When user creates attributes based on this domain, will show in google maps the location of it when the attribute is in display mode (read only) and in insert mode will enable user to select a location from google maps.
Specifies the domain that represents an URL. When user creates attributes based on this domain, will create a link to the url inserted it when the attribute is in display mode (read only).
Specifies the domain that represents an email. When user creates attributes based on this domain, will create a 'mailto' link to send an email to it from the configured email when the attribute is in display mode (read only).
For more information about this domains, and some images about it, follow this link: Domain with specific semantic
Specifies whether to make a 'Return' call after clicking on confirm button or not.
Specifies whether to generate prompt objects for each level of the instances by default, or not. If you set this property on No but you have already created some Prompt objects to some instances, the pattern will not delete those objects when executing Update Instances.
Specifies the image to assign next to filters when they have a prompt node as its children.
Specifies if the filter prompt will filter the foreing key attributes contained in the primary key.
Specifies the image to assign next to the Filter Attribute Multiple with type Prompt.
In this kind of filter it will specify the image:

Specifies the type of the parameters added by default to the Prompt objects. The values are 'Out' or 'InOut'.
You can encrypt the parameters sent to a Prompt.
The following options are available:
- No
- Session Key
- Site Key
- <Use Environment property>
- <Do not update>
Specifies the type to use when having the property 'Auto Prompt / DVelop Combo' enabled, whether it is a prompt or a DVelop Combo.
There are two possibilities:
Specifies the default value for this property on the attributes. The property 'Auto Prompt' specifies whether to generate the prompt rule or add a DVelop Combo control, in case the attribute belongs to some foreign key of the transaction. So, only applies to attributes that are foreign keys to some other transaction.
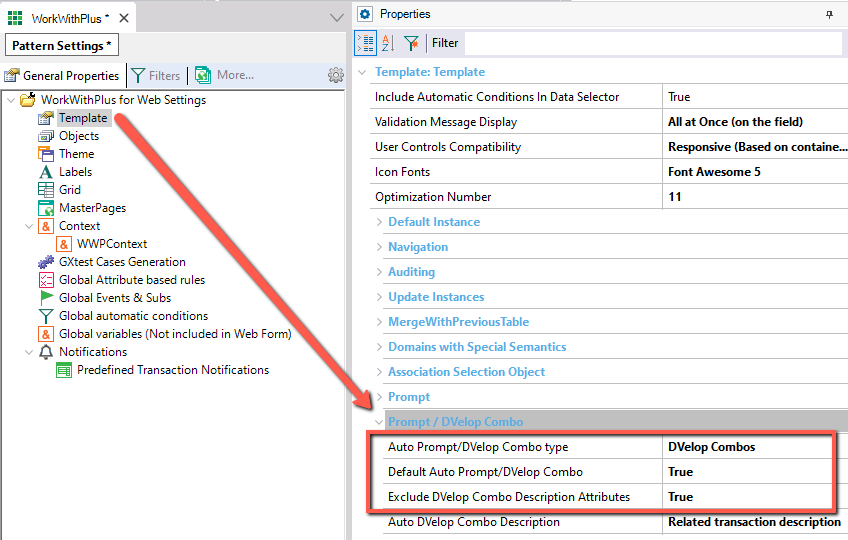
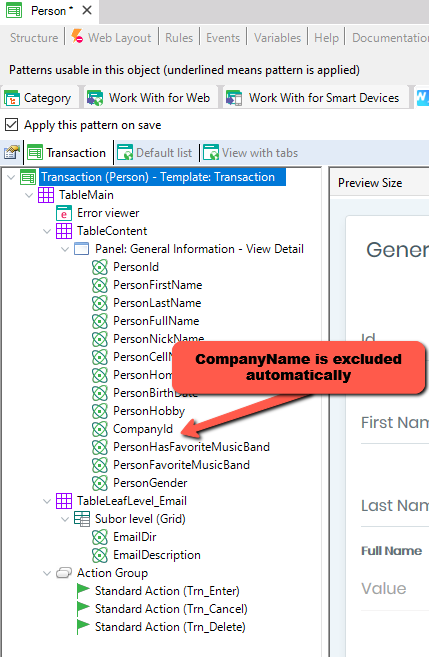
This property specifies whether to exclude or not (from the transaction form) the Description Attribute of a Foreign Key when the property 'Default Auto Prompt / DVelop Combo' is true and the property 'Auto Prompt/DVelop Combo type' is 'DVelop Combo'. This applies to the transaction and view (general tab) instance forms.
For example, having the properties like the following image:
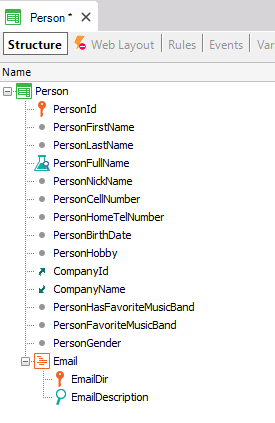
Person transaction has CompanyId as an FK of Company:
So, when the instance is created by WorkWithPlus for Web the attribute CompanyName (which is the Description Attribute of Company transaction) will be automatically excluded:
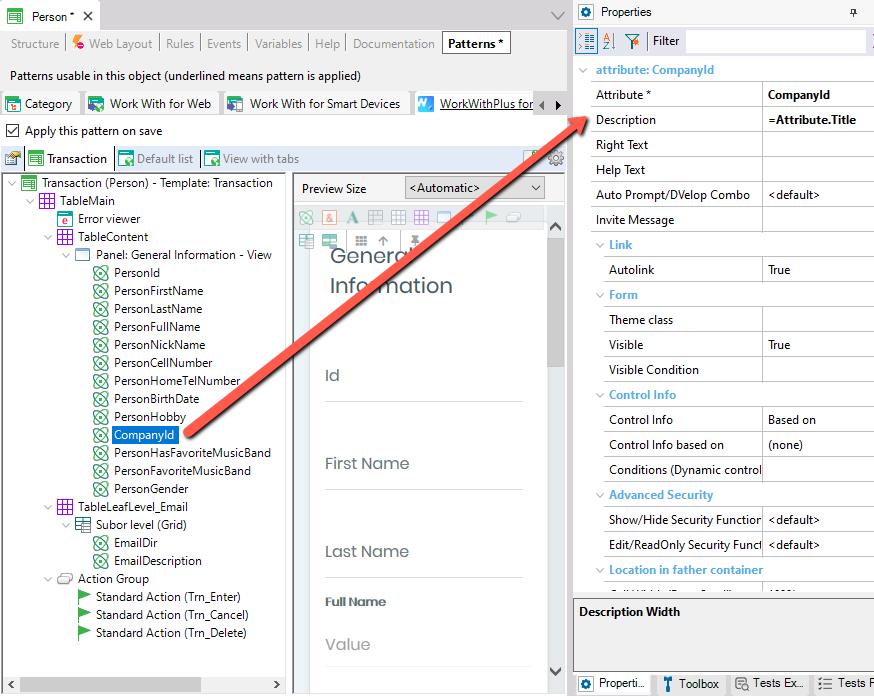
This property specifies the description to assign to the FK attribute when the property 'Default Auto Prompt / DVelop Combo' is true and the property 'Auto Prompt/DVelop Combo type' is 'DVelop Combo'. The options are:
- Related transaction description: it will assign the description of the related transaction. For example, in the Person transaction that has an FK to Company, for CompanyId it will display the description of Company transaction:
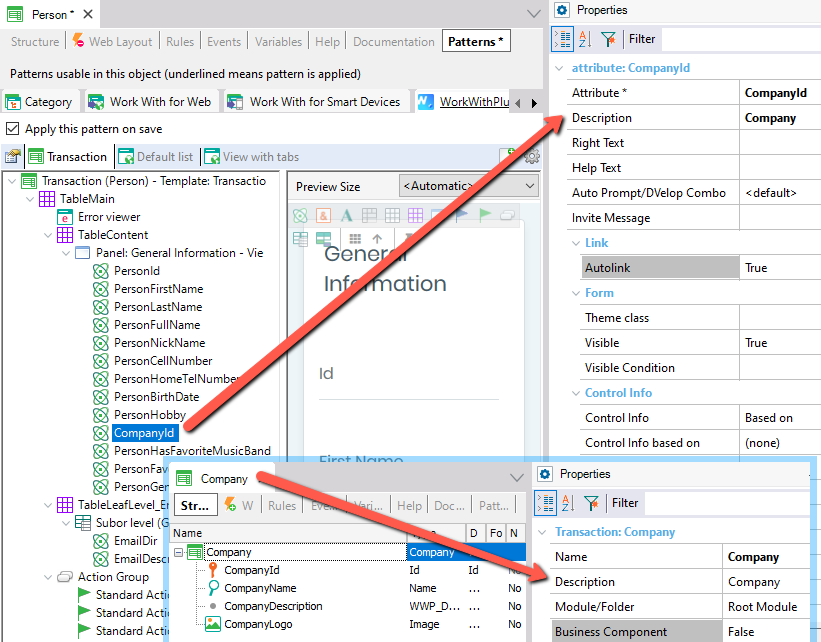
- Attribute description: it will assign the description of the FK attribute. For example, in the Person transaction that as an FK to Company, for CompanyId will assign '=Attribute.Title':
Specifies whether the actions that have Multi Row Selection enabled will or will not check if user selected at least one record of grid before clicking it, and display an error message if no record is selected.


Specifies the default value for this property on User Actions within Transaction instances. This property specifies whether to mantain the records that were selected when navigating to another page of the grid or not. This property only applies for multi row selection in grid objects associated to a transaction instance.
Specifies whether the 'Select all' option in the grid will select all the records of the visible page, or will select the records of all the pages that are being filtered.
Specifies the SDT to be used in the View objects for displaying the tabs of the view. The SDT that comes with WorkWithPlus, and will be set by default is WWPTabOptions:

In order to achieve this, each 'Grid Tab' node has a property named 'Caption record count'. The possible values are True, False or <default>. The value '<default>' is taken from WorkWithPlus for Web Settings > Template > 'Grid Tab Count'.
When this property is True, the View object will calculate the count of each Grid Tab data, displaying the information in the caption, like follows:
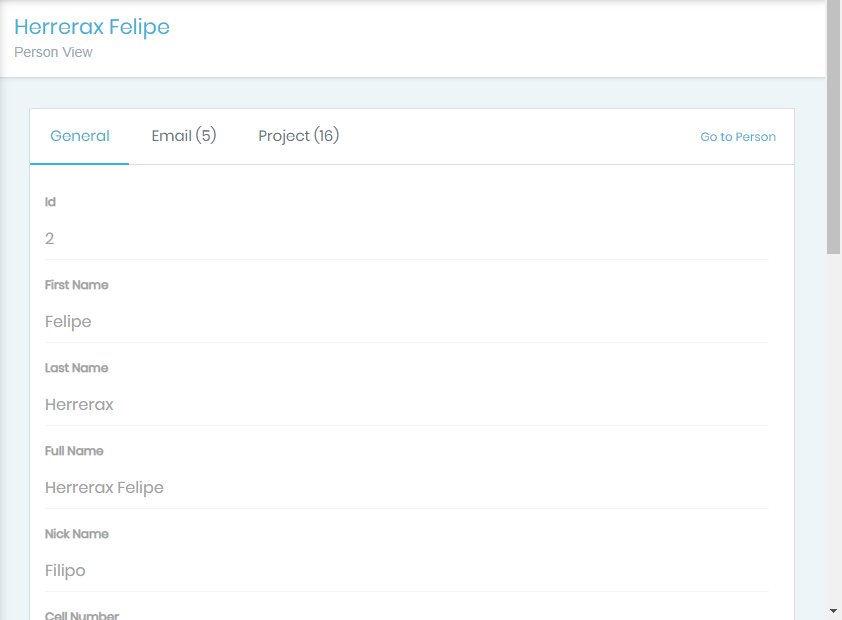
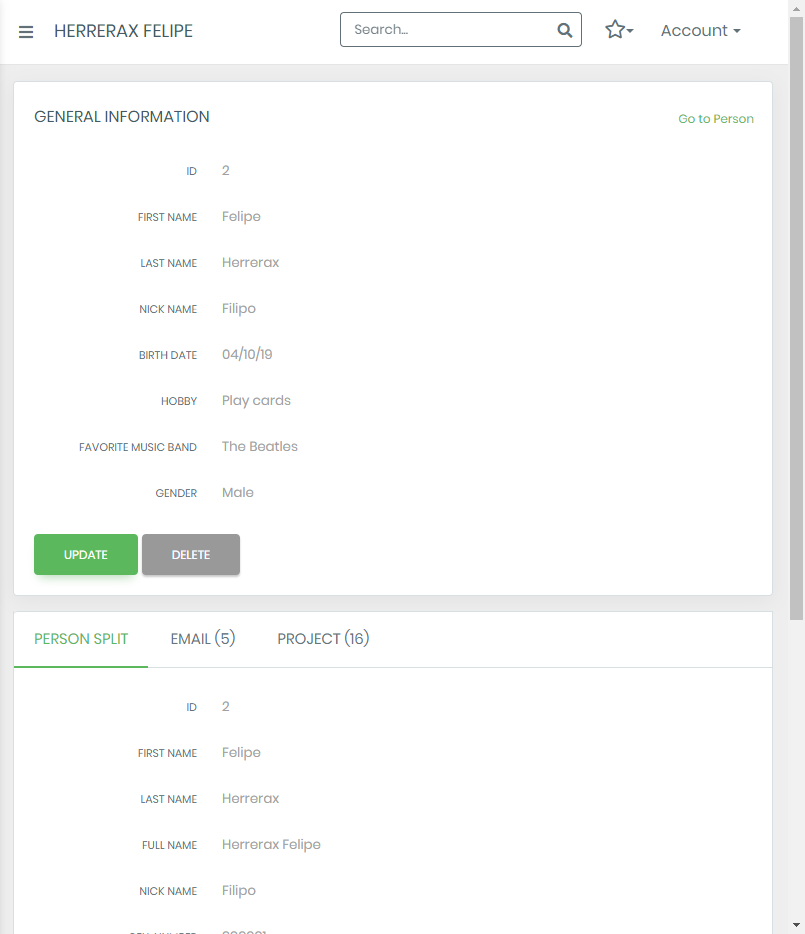
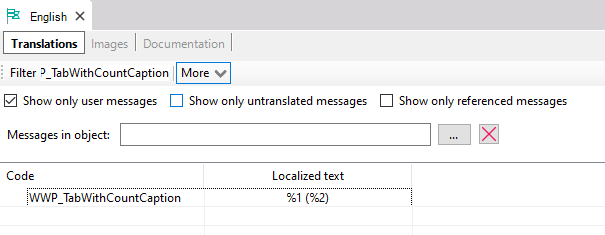
If you want to change the way that the count is displayed, you change it directly in the language resource (the key is WWP_TabWithCountCaption):
Specifies the TabPanel control that will be displayed on the forms when adding a Tabs node in the instances. The options are: DVelop Bootstrap or GXUI.

DVelop Bootstrap: the TabPanel DVelop Bootstrap control is a control developed by DVelop for using with WorkWithPlus. Uses the Bootstrap 3.0 library that Twitter created in order to have applications with the new tendencies of web applications.

GXUI: is the TabPanel control dveloped by GXUI library.

Behavior when tabs exceed the width of the page.
Two possible values:
Specifies the Panel control that will be displayed on the forms when adding a Panel node in the instances. The options are: DVelop Bootstrap or GXUI.

DVelop Bootstrap: the Panel DVelop Bootstrap control is a control developed by DVelop for using with WorkWithPlus. Uses the Bootstrap 3.0 library that Twitter created in order to have applications with the new tendencies of web applications.

GXUI: is the Panel control dveloped by GXUI library.

Specifies whether to show or not the Collapse Icon in Panel control. Applies only when the Panel Type is DVelop Bootstrap.
If this property has the value False, in order to expand/collapse the Panel you have to click in the Title:

If this property has the value True, it will display an icon in order to collapse/expand the panel:

Specifies the position of the collapse/expand icon. Applies only when the Panel Type is DVelop Bootstrap and when the property 'Panel Show Collapse Icon' is True. The values are Left and Right.
Specifies the default value for this property on Action Group nodes. This property specifies whether the Action group will be displayed as a Combo Box, GX Action Group or as a DVelop Bootstrap Drop Down Options. There is an example of these options on the following link: Action Group Node
Specifies the default value for this property on 'Grid Action Group' nodes inside grids. This property specifies whether the Action Group inside grids will be displayed as a combo box or as a DVelop Bootstrap Drop Down Options.
Specifies the position where the help description will be diplayed. The options are:
- Tooltip on description: will display the tooltip when positioning the mouse in the description of the attribute:

- Tooltip on value: will display the tooltip when positioning the cursor or the mouse in the field value:

- Tooltip on both: will display the tooltip when positioning the mouse in the description or positioning the mouse or cursos in the field value.
- Information Icon: will display the tooltip when positioning the mouse in the icon:

This property must coincide with the property 'Class Selector' of the control DVelopBootstrapTooltip that is included in the MasterPage that you are using for the application.
If you leave the property 'Class Selector' of the control empty, you should set it empty in this property also, and it means that all the tooltips of all the applications will be displayed using the DVelopBootstrapTooltip control.
By default this property in the User Control is 'BootstrapTooltip' so the property 'Help Text Theme Class' must be the same


Specifies the icon that will be assigned next to the attribute/variable when the property 'Help Text Display' is Icon.
Specifies the position of the tooltip that will be displayed when positioning the mouse in the Description textblock. The options are left, right, top, bottom. This property only applies when the property 'Help Text Display' is 'Tooltip on Description' or 'Tooltip on Both'
Specifies the position of the tooltip that will be displayed when positioning the mouse or cursor in the value (attribute/variable). The options are left, right, top, bottom. This property only applies when the property 'Help Text Display' is 'Tooltip on Value' or 'Tooltip on Both'
Specifies the position of the tooltip that will be displayed when positioning the mouse in the help icon. The options are left, right, top, bottom. This property only applies when the property 'Help Text Display' is 'Tooltip on icon'.
If this property is True, the data of each of the wizard will be saved in the same Business Component.
Interval in seconds to Save the Wizard data when Resume property is 'Ask User' or 'Always'.
The properties of 'Simple Wizard' category applies when you create a Wizard that won´t have components (the ones that are in the template category 'Create, update and display data'
Specifies whether the wizard will allow to click in some specific step to go directly to that step.
Specifies the image that will be used when creating a simple wizard of type 'Arrow', for separating the selected step with an unselected step right next to it.
Specifies the image that will be used when creating a simple wizard of type 'Arrow', for separating an unselected step with the selected step right next to it.
Two possible values:
- Contains
- Starts with
When having a variable that its 'Control type' is 'DVelop Combo' and has multiple selection (property 'Allow Multiple Selection' as true), you can configure with this property if you want to have an option to display only the ones that are selected.
Specifies the maximum amount of items to load when the property 'Load Data Dynamically' is true on an attribute/variable that its control type is 'DVelop Combo'.
When having multiple selection of an Extended Combo (attribute/variable that its control type is 'DVelop Combo'), with this property you will be able to select whether you want to display them as descriptions separated by commas, or visualize it like tags.

Specify the different ways to display the values within the DVelop Combo. You can include up to 3 attributes within the combo. It includes a title, description and even an image. With this we achieve a better description of the displayed value.

This property is where you define the properties that will be displayed in the DVelop Combo style when defining it in a Web Panel or Transaction.

It will look like the image below when creating your DVelop Combo.

Specifies the Font Awesome icon that will be displayed before the text. It can be formatted with another class defined in the Section node of the Theme to specify the color and size of the icon.
Specifies the position of the Popover that will be displayed when hovering the button or clicking on it. The options are left, right, top, bottom.
Specifies what action must be taken to display the Popover. The options are Click and Hover.
Search result style.
Include or not the search field in Master Page.
Masks defined to use on attributes/variables.
Possible values:
- IP Address
- Thousand separator
- CPF**
- CNPJ**
- CPF or CNPJ**

** If the Knowledge Base's language is set to "Portuguese", the CPF, CNPJ and CPF or CNPJ options will be available by default.
You can define your own Masks which you can use in any instance of WorkWithPlus for Web.
- Description: Thousand separator decimal
- Value: #<THS>##0<DEC>00;reverse
Once a new mask is created within WorkWithPlus for Web Settings, you will be able to use it in any instance of your KB.
The following table shows the wildcards characters that can be entered for the property:
| 0 |
Only Number |
| 9 |
Optional Number |
| S |
Only letter |
| A |
Letter or Number |
| <THS> |
Thousands separator |
| <DEC> |
Decimal separator |
An example of completing and formatting a field for a phone number would be the following

To achieve this, we have two formats, one for 10 digits, and if a digit 11 is placed, it is placed where the number 9 is, taking the second format and adding it in the position of the optional number.
|
(00) 0000-0000;(00) 00009-0000
|
|