Theme Updates

When your KB has a WorkWithPlus Theme imported in a version previous, and want to use a feature from a newer version, some theme classes may be required for that feature. So, we provide a way of only importing the necessary classes for that specific feature.

Step 1: Enable the Theme Updates Option

Go to GeneXus Tools menu -> Options and in WorkWithPlus category set the property 'Show Theme Updates Option' to True.
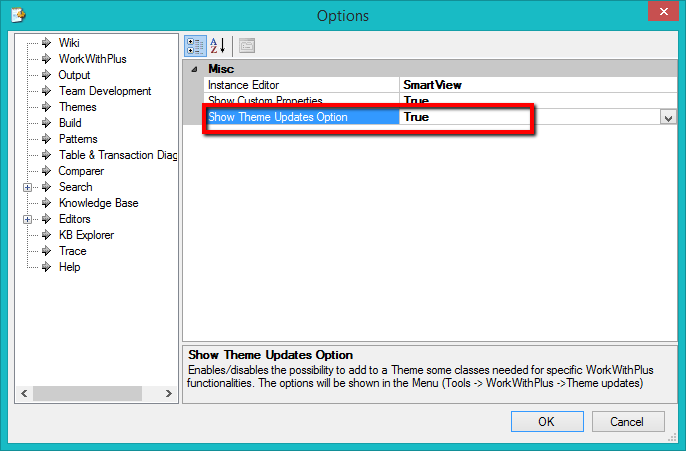
GeneXus IDE Options dialog with the WorkWithPlus section tree on the left (Wiki, WorkWithPlus, Output, Team Development, Themes, Build, Patterns, etc.) and the Misc settings panel on the right; the 'Show Theme Updates Option' row is set to True and highlighted with a red box, with its description below explaining it enables adding WorkWithPlus-specific classes to a Theme via Tools > WorkWithPlus > Theme updates.

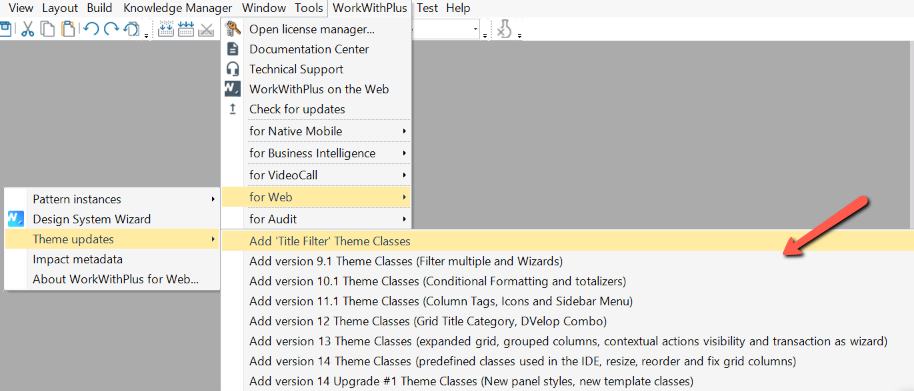
Step 2: Select the Theme Update for your feature

GeneXus IDE main menu with WorkWithPlus menu open, submenu Theme updates > for Web expanded, listing versioned theme-class options such as 'Add version 9.1 Theme Classes (Filter multiple and Wizards)' through 'Add version 14 Upgrade #1 Theme Classes (New panel styles, new template classes)', with a red arrow pointing at the highlighted 'Add version 14 Upgrade #1' entry.

Step 3: Select your actual Theme Object

Select the Theme that you are using in this KB, so that WorkWithPlus adds the needed classes to it:
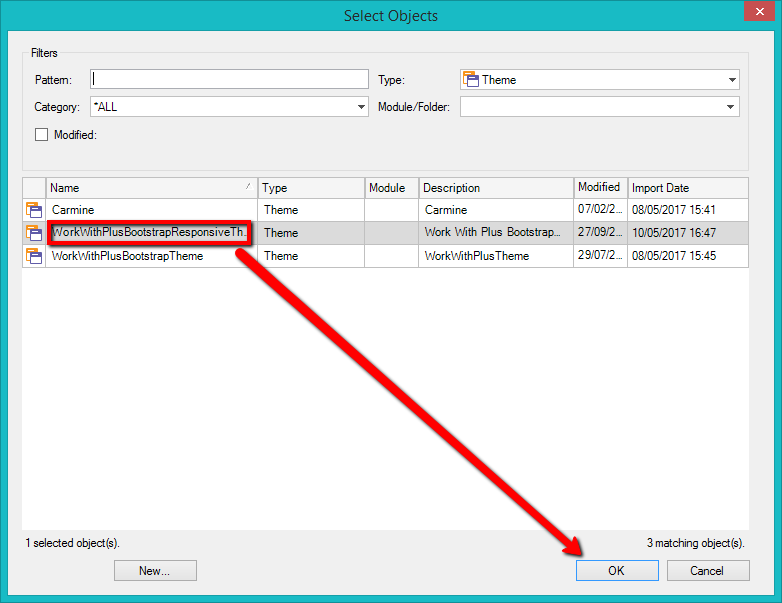
GeneXus 'Select Objects' dialog filtered by Type 'Theme', listing Carmine, WorkWithPlusBootstrapResponsiveTheme, and WorkWithPlusBootstrapTheme; WorkWithPlusBootstrapResponsiveTheme is selected and highlighted in red, with a red arrow pointing to the OK button to confirm the theme choice.

After pressing "Ok", all the needed classes will be added to your current Theme. Now you can start using the desired feature.

If you are using GXServer and the KB is distributed to more than one developer, these steps should be done just by one developer, and then commit the changes so that the other developers can update the theme.